Category: Projects Related to Palm OS PDAs
Serial Communication with Palm OS - Part 3/4
On Ubuntu 18.04 and Java
Published on: 2019-11-23
After having a Palm-OS application which is able to send some data via the serial interface and reading them from a command line on Ubuntu 18.04, it would be nice to have a better environment to take control of. One way to achieve this is to read and process the data in Java.
For this part, three components are needed:
- A Java environment
- The Eclipse IDE
- A suitable library for reading from/writing to the serial interface
For the first two "components" there are a lot of tutorials and how-tos available like these:
How To Install Java with `apt` on Ubuntu 18.04 (FYI: the "JDK" - Java Development Kit - is needed.) How To Install Eclipse Oxygen IDE On Ubuntu 16.04 | 17.10 | 18.04 (FYI: This site also explains how to install a JDK.)
For the last "component," there are two libraries available:
Of course, there are more libraries available, like "java-simple-serial-connector," but in my case "RXTX" worked best with Ubuntu 18.04 and "jSerialComm" worked best with Windows XP.
RXTX installation - Part 1/2 - shared object
Just install the RXTX package via apt:
sudo apt-get install librxtx-java
This installs some .so files which must be recognized by Java. These files get installed in:
/usr/lib/jni/
Because only the serial interface is used in this case, there is only one file needed:
/usr/lib/jni/librxtxSerial-2.2pre1.so
This is the current version (23.11.2019), maybe it will be another version in the future.
This file needs to be copied into the JDK/lib/i386/ folder. In order to get the correct "JDK" path, just run:
whereis java
and the output should look like this:
java: /usr/bin/java /usr/share/java /usr/lib/jvm/java-11-openjdk-amd64/bin/java /usr/share/man/man1/java.1.gz
In this case, "/usr/lib/jvm/java-11-openjdk-amd64/bin/java" or "/usr/lib/jvm/java-11-openjdk-amd64/" is the correct path. So the correct copy command looks like this:
sudo cp /usr/lib/jni/librxtxSerial-2.2pre1.so /usr/lib/jvm/java-11-openjdk-amd64/lib/i386/librxtxSerial.so
RXTX installation - Part 2/2 - Java Archive
The "/usr/share/java" folder should contain the "RXTXcomm-2.2pre2.jar", otherwise search for "RXTXcomm*.jar" to get the correct location:
sudo find / -name "RXTXcomm*.jar"
After knowing the correct location, the RXTXcomm*.jar needs a link in Eclipse:

- Click on the project and hit "Alt+Enter" to open the properties for the project
- Select "Java Build Path" in the menu
- Select the "Libraries" tab
- Select "Modulepath"
- Add the RXTXcomm*.jar via the "Add External JARs..." button
The Java Application
Now, everything is set up in order to create the application. There are some examples available to create a small program which lets you read from the serial interface. The following example is very simple:
Show/hide source code
package rxtx;

import gnu.io.CommPort;
import gnu.io.CommPortIdentifier;
import gnu.io.PortInUseException;
import gnu.io.SerialPort;

import java.io.IOException;
import java.io.InputStream;

public class SerialReader {

    // It's important to set the correct serial port path.
    static final String COMPORT = "/dev/ttyUSB0";

    // Also important to set the correct baud rate. Server and Client need the same value.
    static final int BAUD_RATE = 9600;

    /*
     *  This method opens the serial port and calls the read method in order to read from the serial interface.
     */
    public void handlePortInterface() throws Exception {

        // The portIdentifier controls the access to communications ports, in this case the serial port.
        CommPortIdentifier portIdentifier = CommPortIdentifier.getPortIdentifier(SerialReader.COMPORT);

        // Here is checked if the port is available.
        if (this.checkPort(portIdentifier)) {

            // If the check before was successful, the port gets opened.
            CommPort commPort = portIdentifier.open(this.getClass().getName(), 2000);

            // A small check if the correct kind of port is used.
            if (commPort instanceof SerialPort) {
                SerialPort serialPort = (SerialPort) commPort;

                // Now, some parameters, like the baud rate, are set.
                serialPort.setSerialPortParams(SerialReader.BAUD_RATE, SerialPort.DATABITS_8, SerialPort.STOPBITS_1,
                        SerialPort.PARITY_NONE);

                // At this point, the program is ready to read from the serial interface.
                this.readFromSerial(serialPort.getInputStream());

                // After the communication has finished, the port can be closed.
                serialPort.close();

            } else {
                throw new Exception("No serial port!");
            }

        }

    }

    /**
     * This method checks if the serial port is available and not used by another application.
     *
     * @param portIdentifier
     * @return
     * @throws PortInUseException
     */
    private boolean checkPort(CommPortIdentifier portIdentifier) throws PortInUseException {

        if (portIdentifier.isCurrentlyOwned()) {
            throw new PortInUseException();
        }

        return true;
    }

    /**
     * This function reads from an InputStream and prints the related strings on the console.
     *
     * @param in
     */
    private void readFromSerial(InputStream in) {
        byte[] buffer = new byte[1024];
        int len = -1;
        try {
            while ((len = in.read(buffer)) > -1) {
                System.out.print(new String(buffer, 0, len));
            }
        } catch (IOException e) {
            e.printStackTrace();
        }
    }

    /**
     * The "starting point" of this small program.
     *
     * @param args
     */
    public static void main(String[] args) {
        try {
            SerialReader sr = new SerialReader();
            sr.handlePortInterface();

        } catch (Exception e) {
            e.printStackTrace();
        }
    }
}
The source code is based on this example.
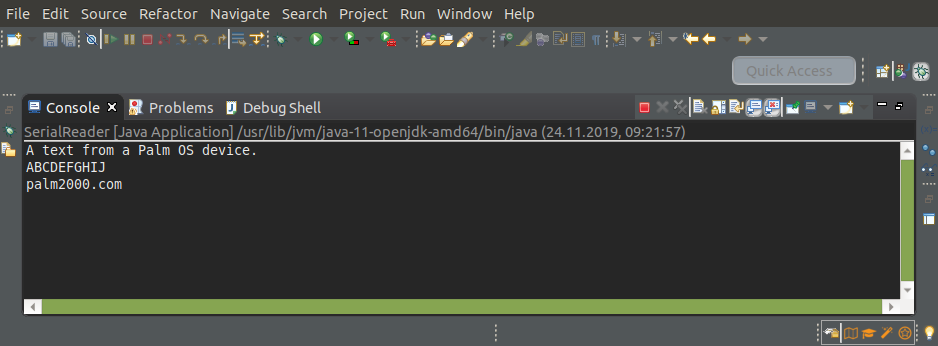
After the program is executed and some data is sent from the related Palm OS application, which was created here, it should look like this:

The last part (4/4) describes how the data from the application can be read with Java on Windows XP:
Serial Communication with Palm OS on Windows XP and Java