Be warned: Windows XP is outdated and should not be used in a production environment. The best way to use it is without a WiFi or LAN connection.
Sometimes, there are applications that only run on Windows XP, like CodeWarrior 9 for Palm OS Development. This IDE has an advantage over development on Ubuntu: The debugger works just fine out of the box. This is one reason why this article exists.
For developing applications on Windows XP, I got myself a Fujitsu Futro S900, which is not perfect in this case, but it does the job and has some advantages like the fanless design and the two serial ports. On the downside, it is a bit slow, especially for the Eclipse IDE.
Preparation
A few words regarding Eclipse and the needed Java JDK: On Windows XP, Eclipse "Helios" works great, and as a JDK, java-1.8.0-openjdk-1.8.0.232-1.b09.ojdkbuild.windows.x86_64.zip is still available. Just download the "java-1.8.0-openjdk-1.8.0.232-1.b09.ojdkbuild.windows.x86_64.zip" and extract it into a folder of your choice. Afterwards, the path pointing to "...\java-1.8.0-openjdk-1.8.0.232-1.b09.ojdkbuild.windows.x86\bin" must be inserted into the PATH environment variable.
In order to be able to communicate or receive data from a Palm through the serial port, like on Ubuntu, a library is needed that provides this possibility. I had the least problems with "jSerialComm".
Important for Windows XP is to have the correct version of jSerialComm. The needed version is "1.3.9" and it is available here. Also, the "jSerialComm.dll" is needed, which can be found here.
Installation of jSerialComm
The only step that is mandatory is to copy the .jar and .dll files into the Eclipse project folder and integrate the .jar file into your project:
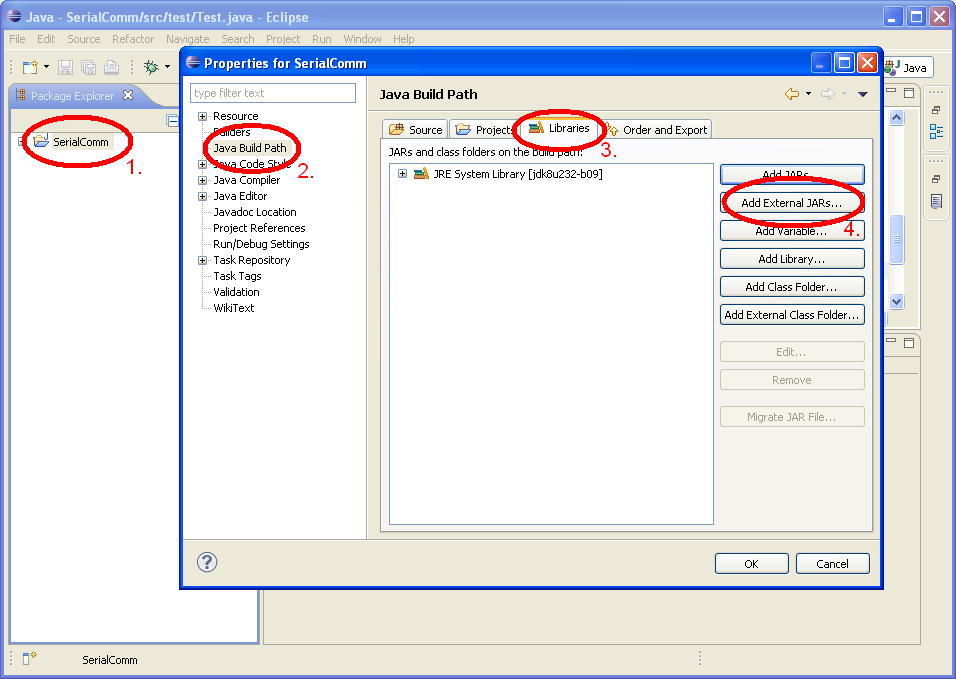
- Click on the project and press "Alt+Enter" to open the properties for the project
- Select "Java Build Path" in the menu
- Select the "Libraries" tab
- Add the jSerialComm.jar via the "Add External JARs..." button
The Java Application
Now, everything is set up for creating the application. There are some examples out there to create a small program that lets you read from the serial interface. The following example is very simple:
Show/hide source code
package serialComm;

import java.io.BufferedReader;
import java.io.IOException;
import java.io.InputStream;
import java.io.InputStreamReader;
import java.io.Reader;

import com.fazecast.jSerialComm.SerialPort;

public class SerialComm {

	/**
	 *
	 * @param args
	 * @throws Exception
	 */
	public static void main(String[] args) throws Exception {

		// An instance of our own class to get access to the readFromSerial method.
		SerialComm serial = new SerialComm();

		// The computer has two serial ports, in my case, the port in position [1] is the correct one.
		SerialPort comPort = SerialPort.getCommPorts()[1];

		// Check if the port was not already opened.
		if (!comPort.isOpen()) {

			// Here some parameters, like the baud rate, are set.
			comPort.setComPortParameters(9600, 8, SerialPort.ONE_STOP_BIT, SerialPort.NO_PARITY);

			// The port gets opened.
			comPort.openPort();

			try {
				while (true) {

					// Get the input stream, if possible.
				    InputStream in = comPort.getInputStream();
				    // ... and read from it.
				    serial.readFromSerial(in);
				}

			}
			// If a NullPointerException occurs, it is probably because getInputStream() failed, which means that the port is already in use by, for example, HotSyncManager.
			catch (NullPointerException e) { System.err.println("Port probably already in use!"); }
			catch (Exception e) { e.printStackTrace(); }
			comPort.closePort();
		} else {
			throw new Exception("Port already opened!");
		}
	}

	/**
	 * This function reads from an InputStream and prints the related strings on the console.
	 *
	 * @param in
	 * @throws IOException
	 */
	private void readFromSerial(InputStream in) throws IOException {
	    Reader reader = new InputStreamReader(in);
        Reader buffer = new BufferedReader(reader);

        int r;
        while (buffer.ready() && (r = buffer.read()) != -1) {
            char ch = (char) r;
            System.out.print(ch);
        }
	}

}
The source code is based on this example.
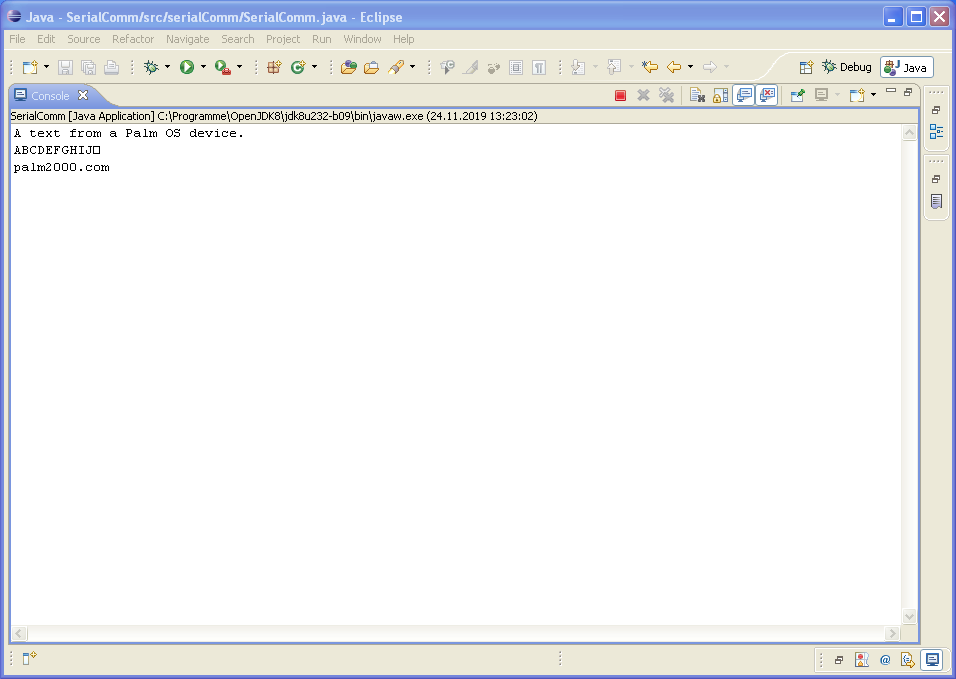
After the program gets executed and some data was sent from the related Palm OS application, which was created here, it should look like this: