This article series deals with equipping an old Palm PDA with an MP3 player. It is not a complicated procedure to keep the effort low, so the PDA serves as a controller and display device for the functions provided by the MP3 module used, a DFPlayer Mini.
For this project, I'm using an old Palm m100. Of course, from the current point of view, there are only old Palm OS devices. But when I got my first PDA, a m100 with Palm OS 3.5, and a few years later, when Palm OS 5 was released, for me, everything with Palm OS 4 (or lower) was old and everything with Palm OS 5 was "new". After all, Palm OS 5 had made a good leap at that time: Bluetooth had found its way into most devices, and it was possible to play videos and music on most devices without having to convert them beforehand. Of course, there were some devices that could do this before, but they were relatively rare. Since the old m1xx devices had nearly no multimedia capabilities and the m100 has an easily accessible connector, my choice fell on this one. Besides the m100, I also have a Sony Clié N770C/U, a Palm m130, a Sony Clié SJ20, and a Handspring Visor Neo to choose from. The N770C already has an Mp3 player, the m130 has a very small connector and the SJ20 has - as far as I've read here - "no simple serial interface". The Visor was no longer a choice because I simply made my first attempts with the m100, and the Visor was only added to my collection later.
The m100 is only used as an example, of course, this project can be transferred to pretty much any Palm that has a serial interface - and that should be the case with every Palm.
This article doesn't really have much to do with Palm OS because it creates the base for the Mp3 player project. Instead of connecting everything to a m100 and hoping that everything is working, I hooked everything up to an Arduino Nano (clone). So this article covers the basics: Communication between an Arduino Nano and a DFPlayer Mini. The choice fell on a DFPlayer Mini because it can be controlled relatively simply over a serial interface. A disadvantage, however, is that the functions are limited to what the Mp3 module has to offer. For example, there is no direct access to the module's SD card, so you can't list files or jump to a position in a music track.
The DFPlayer Mini
The DFPlayer Mini is an Mp3-Player-Module that can be controlled via a serial interface by sending HEX-values. The datasheet can be found here: DFPlayer Mini Datasheet
All relevant functions are described in the datasheet. But there is one topic I want to cover here because it can be a bit tricky.
Data is sent in arrays with hex values like this one:
uint8_t Play[10] = {0x7E,0xFF,0x06,0x03,0x00,0x00,0x01,0xFE,0xF7,0xEF};
Each value represents one property:
- "0x7E" => Start-Byte
- "0xFF" => Version-Information (always "0xFF")
- "0x06" => the number of bytes after "Len", Checksums are not counted
- "0x03" => Command
- "0x00" => Command feedback, "0x00" no feedback, "0x01" feedback
- "0x00" => Argument 1
- "0x01" => Argument 2
- "0xFE" => Checksum 1 (high data byte)
- "0xF7" => Checksum 2 (low data byte)
- "0xEF" => End-Byte
Everything is (more or less) self-explanatory, but the datasheet does not cover how the checksum is calculated and had some erroneous checksum-values (or I have another version of the DFPlayer Mini).
The checksum is calculated like this:
- Sum up every value from (including) "Version-Information" until (excluding) "Checksum 1"
- Convert the result into a decimal value
- Multiply it by "-1"
- Convert the result back into a hex-value, signed 2's complement
With the values above it is:
- 0xFF+0x06+0x03+0x00+0x00+0x01 = 0x109
- 0x109 = 265
- 265 * -1 = -265
- -265 = 0xFEF7 (as signed 2's complement)
FE
is the high data byte and
F7
is the low data byte.
These tools can help to calculate the checksum manually:
The datasheet (on page 6) shows the checksum values "FF" and "E6", which were not working for me.
The Schematic
The schematic is very simple because it only has four components:
- An Arduino Nano
- A DFPlayer Mini
- An Audio-jack (3.5mm)
- A 1kΩ Resistor
... and of course some wires. It is set up like shown here:
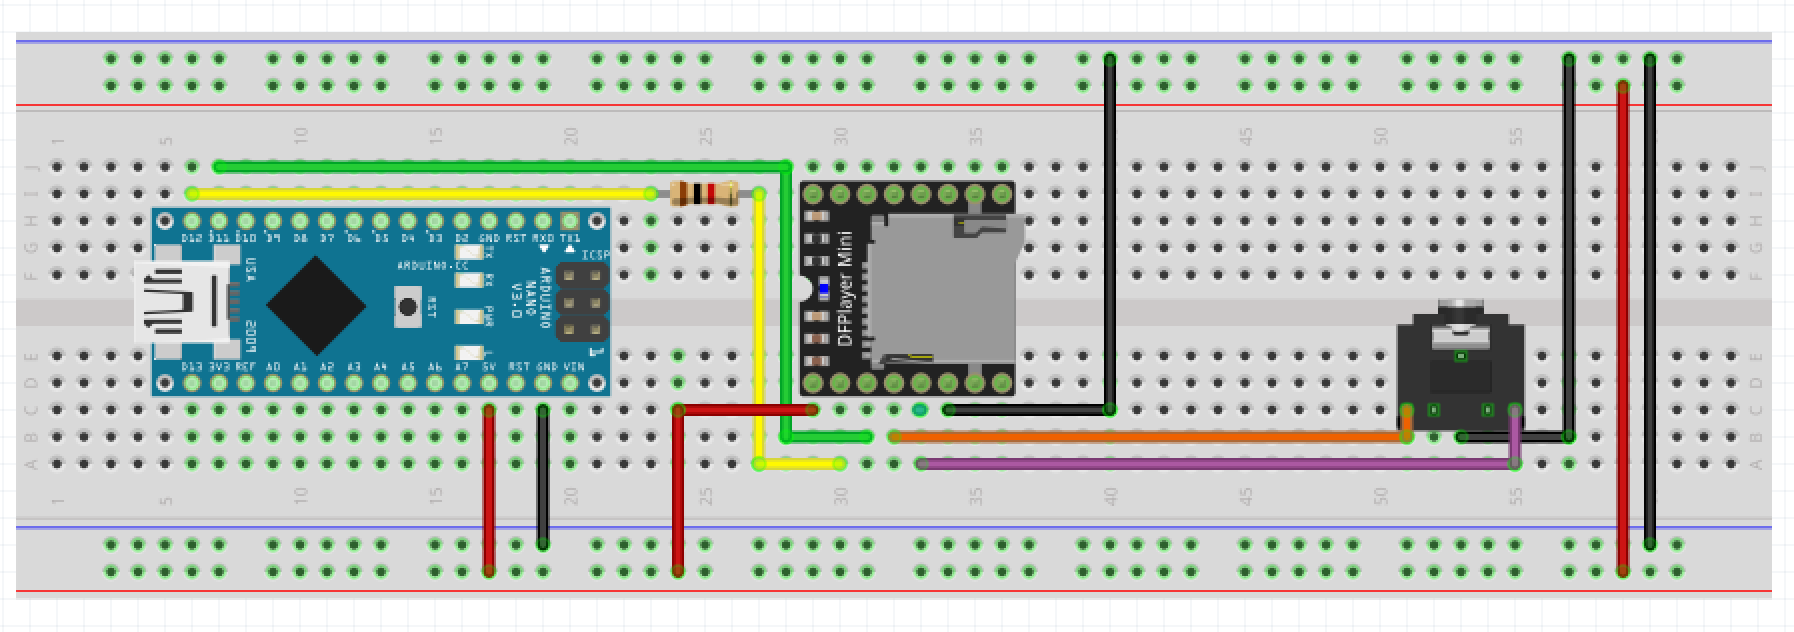
(Open in a new tab for the full resolution.)
The (very simple) Code
The code is as simple as the schematic:
Show/hide source code
#include "Arduino.h"
#include "SoftwareSerial.h"

SoftwareSerial sSerial(10, 11); // RX, TX
void printDetail(uint8_t type, int value);

void setup()
{

  // Defining Pin 10 and 11 as RX/TX-Pins
  int serial1 = 10;
  int serial2 = 11;

  // Software Serial is used to communicate with the DFPlayer-Mini
  SoftwareSerial mySerial(serial1, serial2);

  // Very important is the correct baud rate, in this case (with the DFPlayer Mini): 9600 bps
  mySerial.begin(9600);

  // These values are setting the volume to 10 (of 30)
  uint8_t Volume[10]   = {0x7E,0xFF,0x06,0x06,0x00,0x00,0x0A,0xFF,0xD5,0xEF};

  // These values play the first file on the Micro-SD-Card
  uint8_t Play[10]     = {0x7E,0xFF,0x06,0x03,0x00,0x00,0x01,0xFE,0xF7,0xEF};

  // Sending the values
  mySerial.write(Volume, 10);
  mySerial.write(Play, 10);
}

void loop()
{
  // Nothing to do here
}
The last two steps are copying an MP3 file onto a micro-SD card (simply in the root directory), inserting it into the DFPlayer Mini, and uploading the code to an Arduino Nano (clone). The song should start playing a few seconds after the code upload has finished.
If you want to build an Arduino MP3 player, have a look at this library, which is a helpful wrapper for the DFPlayer Mini: DFRobotDFPlayerMini
Of course, the DFPlayer Mini can do more than just adjust the volume and play a song. But in this article, I just wanted to show a practical example, which you can extend as you like. Following this, the MP3 player application for a Palm should be able to do more than what this article describes.
The next part (2/2) is about connecting the Palm m100 to the MP3 module:
An MP3 Player for old Palm OS devices - New hardware for an old Palm m100